Build and Publish multi-module Android library to Maven Central
Learn to build and publish your single or multi-module Android library to Maven Central!


I have recently built my first Android library, Madifiers, and published it to Maven Central. In this blog, I'll discuss the issues I faced, and how I fixed them. I'll take you through the whole journey right from the start, the project setup, to the final release – so fasten your seatbelts, it's gonna be a hell of a ride!
Table of Contents
- Introduction
- Project Setup
- Gradle Conventional Plugins
- Code Formatting
- Register Sonatype Account
- GPG Key generation and distribution
- Gradle Scripts
- Publishing
- Bonus Links
Introduction
Well, first of all, it's great of you to think about contributing to open source by building libraries. The initial setup is not going to be easy, but I promise the end result is gonna be worth it.
Now before we start the process, there's a few things that're necessary for you to know – Maven is not your only option to publish, and you can also publish it to jitpack.io, which is an easy to set up repository to publish your JVM or Android libraries.
This Twitter thread summarizes pretty well why Jitpack might not be the best option to publish your library, but the gist is that Jitpack could be a great choice if your library is for casual-use and you are developing it as a personal project, but it's not recommended if you're planning to develop it for serious or long-term use cases.
Now that we got that out of the way, the question that arises is whether your library is going to be a single or multi-module library. One thing to make clear here is that One Module == One Library. If you want a single library to have multiple features they could be in a single module.
In my case, I wanted to make a collection of modifiers, extension functions, and composables, while keeping it easy for others to contribute. Having them in a single module would have made it hard to manage and contribute, and scale code in the future, so I decided to go with a multi-module library.
There are a few plugins to make your life easy if you decide to go for a single-module library, which we will discuss later on. Note that this blog will focus mostly on publishing a multi-module library.
Project Setup
The project creation is similar to creating a new Android project. A few things to note here are – make sure you own the domain you provide in the package name, since this will be needed while setting up a Sonatype account. Also, for build configuration, use Kotlin DSL with Gradle Version Catalogs – this makes reusing dependencies easy once your project is generated. Now, change your project view from Android to Project, right click your root directory, and click New -> Module.

Once you do that, this wizard will show up:
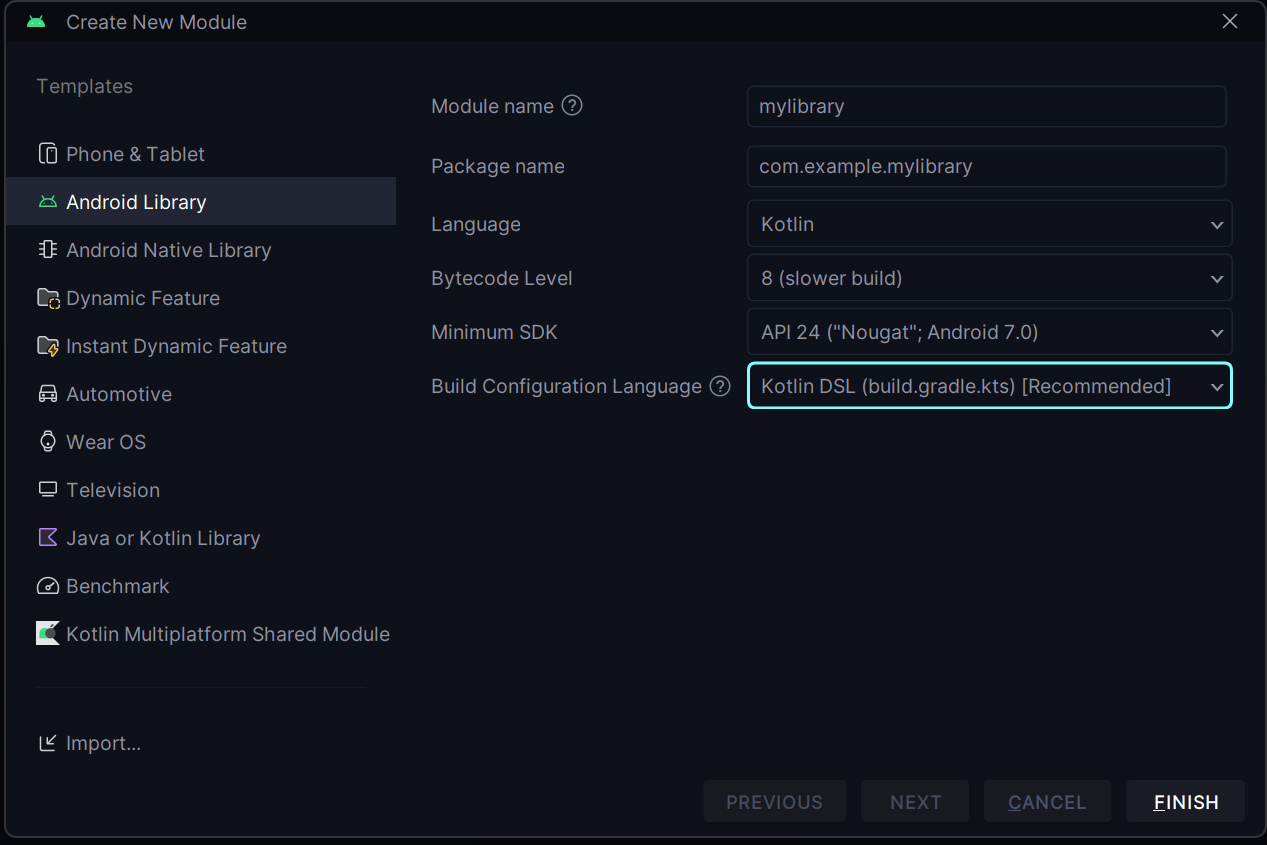
Here we have multiple options, but the one we are interested in is Android Library. Make sure to use the same domain here. Also, make sure it's the same in every module once it's generated. Feel free to remove test directories. Next, the step is to now. The final setup is to set up Gradle. When you create a new module, you will be greeted with:
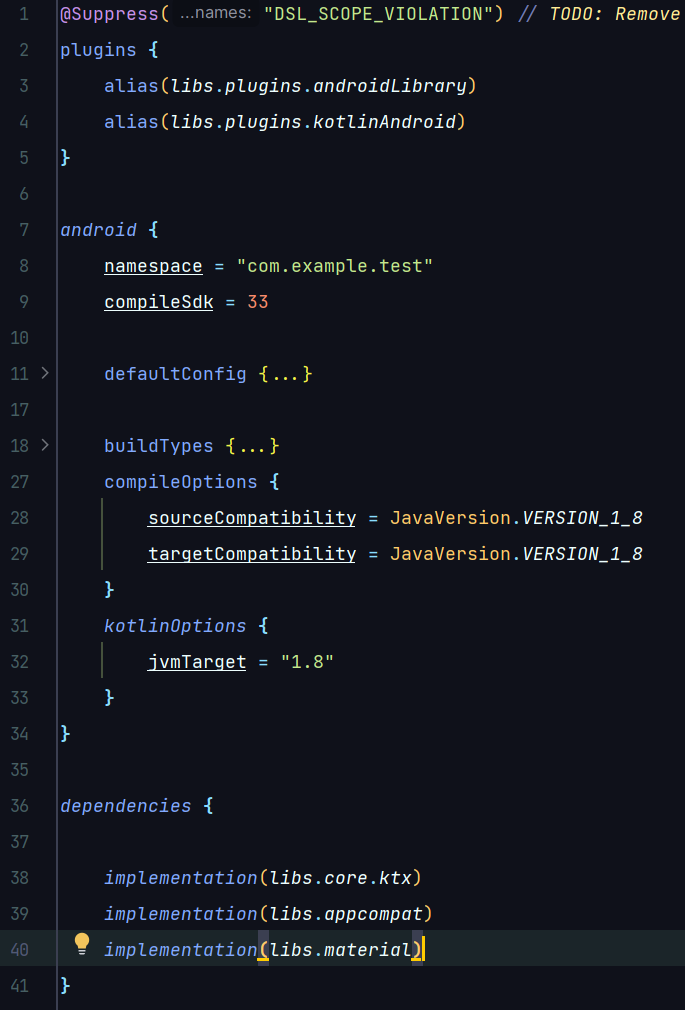
As you can see on top, we have an Android library and Kotlin plugin. Make sure to not add your application-specific plugin to your library. Here, there are a few things to keep track of: your Kotlin JVM target and your compile options. If they do not match with other modules or your app, they might conflict while building. Only include the dependencies that your module requires, as they increase build size and can impact the library performance. So, as you can see, managing the versions can be a hassle as the project grows. Thus, we include the Gradle conventional plugin to keep a single source of truth for common module configurations.
Gradle Convention Plugins
More often than not, once your project grows bigger, it ends up having many random *.gradle(.kts) scripts, messy subprojects, and an allprojects block, which can cause code duplication and make debugging even harder. Convention Plugins are Gradle’s way of sharing your build logic between submodules and addressing the above concerns, and the Now in Android app takes full advantage of this. So, to set up the conventional plugin, I suggest doing it manually. First, create a dir and name it build-logic, and structure it in the following way:
├── build-logic
│   ├── convention
│       ├── src/main/kotlin/your/domain/convention
│   ├── .gitignore
│   ├── build.gradle.kts
├── gradle.properties
├── settings.gradle.kts
Now, in settings.gradle.kts under /build-logic, add these lines:
enableFeaturePreview("TYPESAFE_PROJECT_ACCESSORS")

dependencyResolutionManagement {
    repositories {
        google()
        mavenCentral()
    }
    versionCatalogs {
        create("libs") {
            from(files("../gradle/libs.versions.toml"))
        }
    }
}

include(":convention")
And add this line to your root settings.gradle.kts:
pluginManagement {
    includeBuild("build-logic")
    repositories {
        ...
    }
}
This way, we're telling gradle to treat build-logic as separate from our modules and app so our plugins only get compiled when necessary and not with rest of the project. For that we need to add a few properties in gradle.properties under /build-logic:
org.gradle.parallel=true
org.gradle.caching=true
org.gradle.configureondemand=true
Now we move to build.gradle.kts under /build-logic/convention and add the following code:
plugins {
    `kotlin-dsl`
}

group = "your group id here"

java {
    sourceCompatibility = JavaVersion.VERSION_17
    targetCompatibility = JavaVersion.VERSION_17
}

dependencies {
    compileOnly(libs.android.gradlePlugin)
    compileOnly(libs.kotlin.gradlePlugin)
    compileOnly(libs.spotless.gradlePlugin)
}
Here, make sure to add your group id and re-confirm that the Java version matches with the root project. Once you're done here, its time to finally write the plugin. Your plugin code goes under your /java or /kotlin dir and your configuration goes under convention.
First, we will create our application plugin. Create a new kt file, and name it AndroidApplicationComposeConventionPlugin.kt. Add the following code to it:
class AndroidApplicationComposeConventionPlugin: Plugin<Project> {
    override fun apply(target: Project) {
        with(target) {
            pluginManager.apply("com.android.application")
            pluginManager.apply("org.jetbrains.kotlin.android")

            extensions.configure<BaseAppModuleExtension> {
                configureAndroidCompose(this)
                configureKotlinAndroid(this)
            }

        }
    }

}
Here we manually apply plugins and add both Kotlin and Android configurations for our project, which we'll code later. Now create a new kt file and name it AndroidLibraryComposeConventionPlugin.kt and add the following code:
class AndroidLibraryComposeConventionPlugin: Plugin<Project> {
    override fun apply(target: Project) {
        with(target) {
            pluginManager.apply("com.android.library")
            pluginManager.apply("org.jetbrains.kotlin.android")

            extensions.configure<LibraryExtension> {
                configureAndroidCompose(this)
                configureKotlinAndroid(this)
            }
        }
    }
}
First we will create our android configuration. Create a file, name it AndroidCompose.kt, and add the following code:
internal fun Project.configureAndroidCompose(
    commonExtension: CommonExtension<*,*,*,*,*>
) {
    val libs = extensions.getByType<VersionCatalogsExtension>().named("libs")

    commonExtension.apply {
        buildFeatures {
            compose = true
        }


        composeOptions {
            kotlinCompilerExtensionVersion = libs.findVersion("compose-compiler").get().toString()
        }

        kotlinOptions {
            freeCompilerArgs = freeCompilerArgs + buildComposeMetricsParameters()
        }

        packaging {
            resources {
                excludes.add("/META-INF/{AL2.0,LGPL2.1}")
            }
        }

        dependencies {
            val bom = libs.findLibrary("compose-bom").get()
            add("implementation", platform(bom))
            add("androidTestImplementation", platform(bom))
        }
    }
}

private fun Project.buildComposeMetricsParameters(): List<String> {
    val metricParameters = mutableListOf<String>()
    val enableMetricsProvider = project.providers.gradleProperty("enableComposeCompilerMetrics")
    val enableMetrics = (enableMetricsProvider.orNull == "true")
    if (enableMetrics) {
        val metricsFolder = File(project.buildDir, "compose-metrics")
        metricParameters.add("-P")
        metricParameters.add(
            "plugin:androidx.compose.compiler.plugins.kotlin:metricsDestination=" + metricsFolder.absolutePath
        )
    }

    val enableReportsProvider = project.providers.gradleProperty("enableComposeCompilerReports")
    val enableReports = (enableReportsProvider.orNull == "true")
    if (enableReports) {
        val reportsFolder = File(project.buildDir, "compose-reports")
        metricParameters.add("-P")
        metricParameters.add(
            "plugin:androidx.compose.compiler.plugins.kotlin:reportsDestination=" + reportsFolder.absolutePath
        )
    }
    return metricParameters.toList()
}
Feel free to add your own configurations, as required for your project and add the common dependencies here. Now for Kotlin config, create a kt file, name it kotlinAndroid.kt, and add the following code:
internal fun Project.configureKotlinAndroid(
    commonExtension: CommonExtension<*, *, *, *, *>
) {
    val libs = extensions.getByType<VersionCatalogsExtension>().named("libs")

    commonExtension.apply {
        compileOptions {
            sourceCompatibility = JavaVersion.VERSION_17
            targetCompatibility = JavaVersion.VERSION_17
        }

        kotlinOptions {
            jvmTarget = libs.findVersion("jvm-target").get().toString()
            freeCompilerArgs = freeCompilerArgs + listOf(
                "-opt-in=kotlin.RequiresOptIn",
                "-opt-in=kotlinx.coroutines.ExperimentalCoroutinesApi",
            )
        }

        lint {
            abortOnError = false
        }
    }
}

fun CommonExtension<*,*,*,*,*>.kotlinOptions(block: KotlinJvmOptions.() -> Unit) {
    (this as ExtensionAware).extensions.configure("kotlinOptions", block)
}
Now that we've coded our plugin, its time to add it to Gradle. Go to your build.gradle.kts file under /convention, and add the following lines of code:
gradlePlugin {
    plugins {
        register("androidLibraryCompose") {
            id = "madifiers.library.compose"
            implementationClass = "AndroidLibraryComposeConventionPlugin"
        }
        register("androidApplicationCompose") {
            id = "madifiers.application.compose"
            implementationClass = "AndroidApplicationComposeConventionPlugin"
        }
    }
}
Here, you give the ID to each of the plugins, which we will use to call in build.gradle files. Now, all you need to do is add the plugin to your module and app, and remove configurations you already added to the configurations.
plugins {
    id("madifiers.library.compose")
}
To your library modules, and:
plugins {
    id("madifiers.application.compose")
}
To your app build.gradle.kts.
Now you can enjoy clean and easy-to-debug gradle files! :)
Code Formatting
Code formatting is really important for open source or any codebase to make code readable and properly formatted. As code scales, it makes it harder for developers to manually format it. There are multiple ways and tools like spotless, ktlint, and detekt. In this blog, I'll show how you can add Spotless in your multi-module architecture. In this project, we will use Spotless to automatically format code and add licenses to *.kt, *.kts, and *.xml.
We can start by creating a new dir in the project root. Name it Spotless, and add your license to the template files for .kt, .kts, and .xml. Then, create a new .kt file in your build-logic and name it SpotlessConventionPlugin.kt, and add the following code:
class SpotlessConventionPlugin: Plugin<Project> {
    override fun apply(target: Project) {
        with(target) {
            pluginManager.apply("com.diffplug.spotless")

            extensions.configure<SpotlessExtension> {
                kotlin {
                    target("**/*.kt")
                    targetExclude("**/build/**/*.kt")
                    ktlint().editorConfigOverride(mapOf("indent_size" to 2, "continuation_indent_size" to 2))
                    licenseHeaderFile(rootProject.file("$rootDir/spotless/copyright.kt"))
                }
                format("kts") {
                    target("**/*.kts")
                    targetExclude("**/build/**/*.kts")
                    // Look for the first line that doesn't have a block comment (assumed to be the license)
                    licenseHeaderFile(rootProject.file("spotless/copyright.kts"), "(^(?![\\/ ]\\*).*$)")
                }
                format("xml") {
                    target("**/*.xml")
                    targetExclude("**/build/**/*.xml")
                    // Look for the first XML tag that isn't a comment (<!--) or the xml declaration (<?xml)
                    licenseHeaderFile(rootProject.file("spotless/copyright.xml"), "(<[^!?])")
                }
            }
        }
    }
}
Then call it in build.gradle.kts:
gradlePlugin {
    plugins {
        register("spotless") {
            id = "madifiers.spotless"
            implementationClass = "SpotlessConventionPlugin"
        }
        ...
    }
}
Now once we sync, we can add Spotless along with the rest of our plugins:
plugins {
    ...
    id("madifiers.spotless")
}
Then run the following in your root dir:
./gradlew spotlessApply
To apply spotless in your project!
Register Sonatype Account
Stepping aside from IDE for a while, let's create a Sonatype account, which we will use to publish our library. Now, head to Maven Central Sonatype and create an account. Once done, create an account at Sonatype Jira, where we will create our Nexus repository.
Once done, remember the username and password, which we will need to sign our artifacts later. Now, we can create the repo.
Create Repository
After you select your avatar, you will greeted with this dialog box:
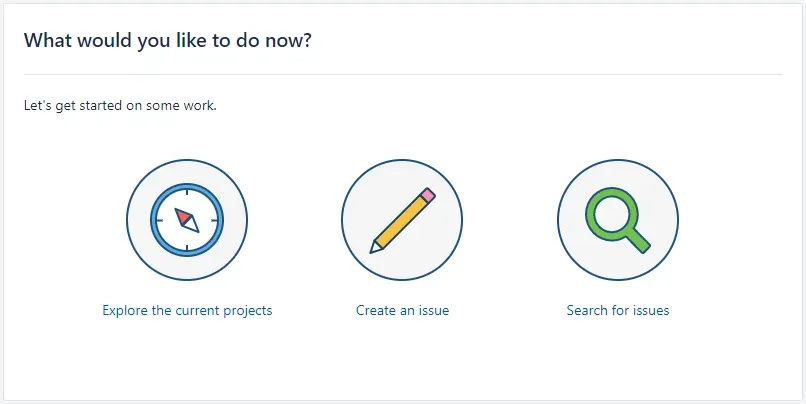
Choose Create an issue:

Here, choose to create a repository for the project, and set the issue type to New Project. You'll also have to fill out info like:
- Summary - Create repository for your.group.id.here
- Description - A quick summary of what your project is
- Group Id - same group id as used in your project
- Project URL - Location of the Project Website, e.g. https://github.com/sonatype/nexus-public
- SCM url - Location of source control system, e.g. https://github.com/sonatype/nexus-public.git
- Username - if you have more developers working on the project, add their username here separated with commas.
- Already Synced to Central - For new repositories, choose no.
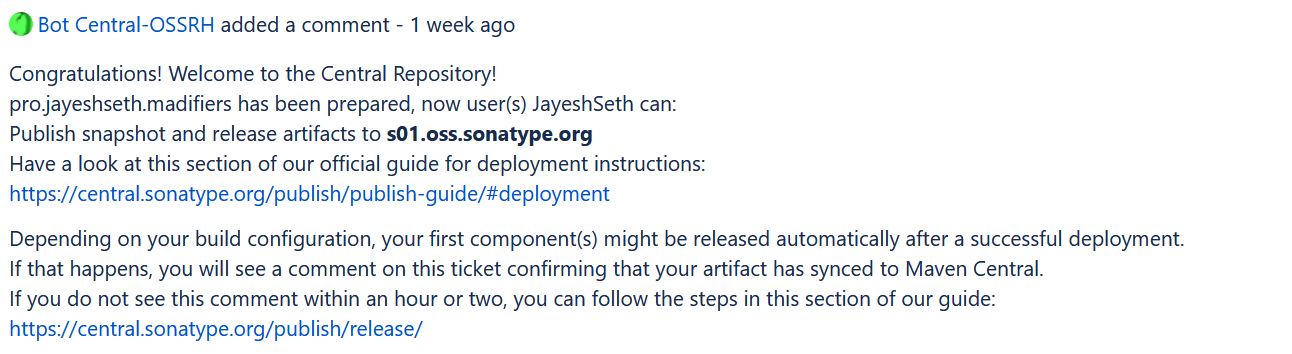
Once you click create, within a few minutes, you should receive this comment:

Here, if you own the domain provided, you have to prove its ownership by adding a DNS record. Or, you can also follow the GitHub method. In my case, I own the domain, so it was fairly simple. For the host, add "@" or leave it blank.

Once done, you can verify it by running:
host -t txt your.domainIf it returns your repo ID, then it means it was successful, and you should receive a comment like this:
GPG Key generation and distribution
We will use our GPG key to sign our artifacts. Maven Central also has its own documentation for Working with PGP Signatures, which you can refer to if you get stuck along the way.
This part requires access to the gpg command. There are several ways to install this via package managers, and there are many distributions available for different platforms on gnupg.org.
To generate a new key, run:
gpg --full-gen-keyYou’ll be prompted to enter a few details:
- Kind of key - Accept the default value, which is
(1) RSA and RSA. - Key size -
4096 - Expiration - You can input
0to generate a key that never expires. You can also create a key that has an expiry date and then renew it periodically if you prefer to do so. - Real name, email - Should be obvious.
After entering these details, you’ll be prompted to enter a passphrase to secure your key. Remember this passphrase as we will need it later.
You can verify key generation by running:
gpg --list-keysWhich should return:

Next, the step is to distribute it to the public server. For this, we will need the last eight digits of your key, for example:
gpg --keyserver keyserver.ubuntu.com --send-keys 41D2B8FCYou can check out Distributing Your Public Key for the list of supported keyservers. For now, you can either create a keyring file or export it as it is by running:
gpg --export-secret-keys 41D2B8FC | base64For the keyring, use this:
gpg --export-secret-keys -o secring.gpgGradle Scripts
Now, it's time to get back to Android Studio to write Gradle scripts, which we will use to publish our modules. Start by creating a directory and name it scripts. Under it, create two scripts and name them publish-root.gradle and publish-module.gradle.
Then, add the Nexus plugin to your root project by:
plugins {
    id("io.github.gradle-nexus.publish-plugin") version "<version>"
}
Now lets start by creating publish-root.gradle. First, create a variable with empty values like so:
// Create variables with empty default values
ext["ossrhUsername"] = ''
ext["ossrhPassword"] = ''
ext["sonatypeStagingProfileId"] = ''
ext["signing.keyId"] = ''
ext["signing.password"] = ''
ext["signing.secretKeyRingFile"] = ''
Now we'll store them in our local.properties file, so add this block of code to read it from local.properties:
File secretPropsFile = project.rootProject.file('local.properties')
if (secretPropsFile.exists()) {
    Properties p = new Properties()
    new FileInputStream(secretPropsFile).withCloseable { is -> p.load(is) }
    p.each { name, value -> ext[name] = value }
} else {
    // Use system environment variables
    ext["ossrhUsername"] = System.getenv('OSSRH_USERNAME')
    ext["ossrhPassword"] = System.getenv('OSSRH_PASSWORD')
    ext["sonatypeStagingProfileId"] = System.getenv('SONATYPE_STAGING_PROFILE_ID')
    ext["signing.keyId"] = System.getenv('SIGNING_KEY_ID')
    ext["signing.password"] = System.getenv('SIGNING_PASSWORD')
    ext["signing.secretKeyRingFile"] = System.getenv('SIGNING_SECRET_KEY_RING_FILE')
}
Then add a Sonatype repo by:
// set up sonatype repo
nexusPublishing {
    repositories {
        sonatype {
            stagingProfileId = sonatypeStagingProfileId
            username = ossrhUsername
            password = ossrhPassword
            nexusUrl.set(uri("https://s01.oss.sonatype.org/service/local/"))
            snapshotRepositoryUrl.set(uri("https://s01.oss.sonatype.org/content/repositories/snapshots/"))
        }
    }
}
Now add following info to your local.properties:
ossrhUsername= username
ossrhPassword= password
sonatypeStagingProfileId=336e8865040abe
signing.keyId=41D2B8FC
signing.password=passphrase you gave earlier
signing.secretKeyRingFile=path to your key ring file
You can get your profile ID by heading to https://s01.oss.sonatype.org/#stagingProfiles and selecting staging profiles:

Finally, apply this plugin to your root build.gradle.kts:
apply(from = "${rootDir}/scripts/publish-root.gradle")
Per Module setup
Now time to create per module scripts. Start by adding these plugins to publish-module.gradle:
apply plugin: 'maven-publish'
apply plugin: 'signing'
Now create a new task named androidSourceJar to, basically, let users to jump to your source code from the IDE:
tasks.register('androidSourcesJar', Jar) {
    archiveClassifier.set('sources')
    if (project.plugins.findPlugin("com.android.library")) {
        from android.sourceSets.main.kotlin.srcDirs
        from android.sourceSets.main.java.srcDirs
    } else {
        from sourceSets.main.java.srcDirs
        from sourceSets.main.kotlin.srcDirs
    }
}
This adds both your java and kotlin src dirs to the Android source JAR. Now, add the following:
artifacts {
    archives androidSourcesJar
}

group = PUBLISH_GROUP_ID
version = PUBLISH_VERSION

afterEvaluate {
    publishing {
        publications {
            release(MavenPublication) {
                tasks.named("generateMetadataFileForReleasePublication").configure { dependsOn("androidSourcesJar") }
                groupId PUBLISH_GROUP_ID
                artifactId PUBLISH_ARTIFACT_ID
                version PUBLISH_VERSION

                // Two artifacts, the `aar` (or `jar`) and the sources
                if (project.plugins.findPlugin("com.android.library")) {
                    from components.release
                } else {
                    from components.java
                }

                pom {
                    name = PUBLISH_ARTIFACT_ID
                    description = ...
                    url = ...
                    licenses {
                        license {
                            name = 'The Apache Software License, Version 2.0'
                            url = 'http://www.apache.org/licenses/LICENSE-2.0.txt'
                        }
                    }
                    developers {
                        developer {
                            id = ...
                            name = ...
                            email = ...
                            url = 'github url'
                        }
                    }
                    scm {
                        connection = ...
                        developerConnection = ...
                        url = ...
                    }
                }
            }
        }
    }
}
You can check out my code here. Now to sign your publication you can either use in-memory PGP keys, which requires you to store your details at ~/.gradle/gradle.properties or local.properties:
signing {
    useInMemoryPgpKeys(
            rootProject.ext["signing.keyId"],
            rootProject.ext["signing.key"],
            rootProject.ext["signing.password"],
    )
    sign publishing.publications
}
or useGpgCmd(). This requires you to have GPG installed on your PC:
signing {
    useGpgCmd()
    sign publishing.publications
}
Publishing
The next step is to apply the script to all the modules and sync
rootProject.extra.apply {
    set("PUBLISH_GROUP_ID", ...)
    set("PUBLISH_ARTIFACT_ID", ...)
    set("PUBLISH_VERSION", ...)
}

apply(from = "${rootDir}/scripts/publish-module.gradle")
Now you can run the following in your root directory to push all your modules to the Maven repo:
./gradlew publishReleasePublicationToSonatypeRepositoryTo push each module standalone run:
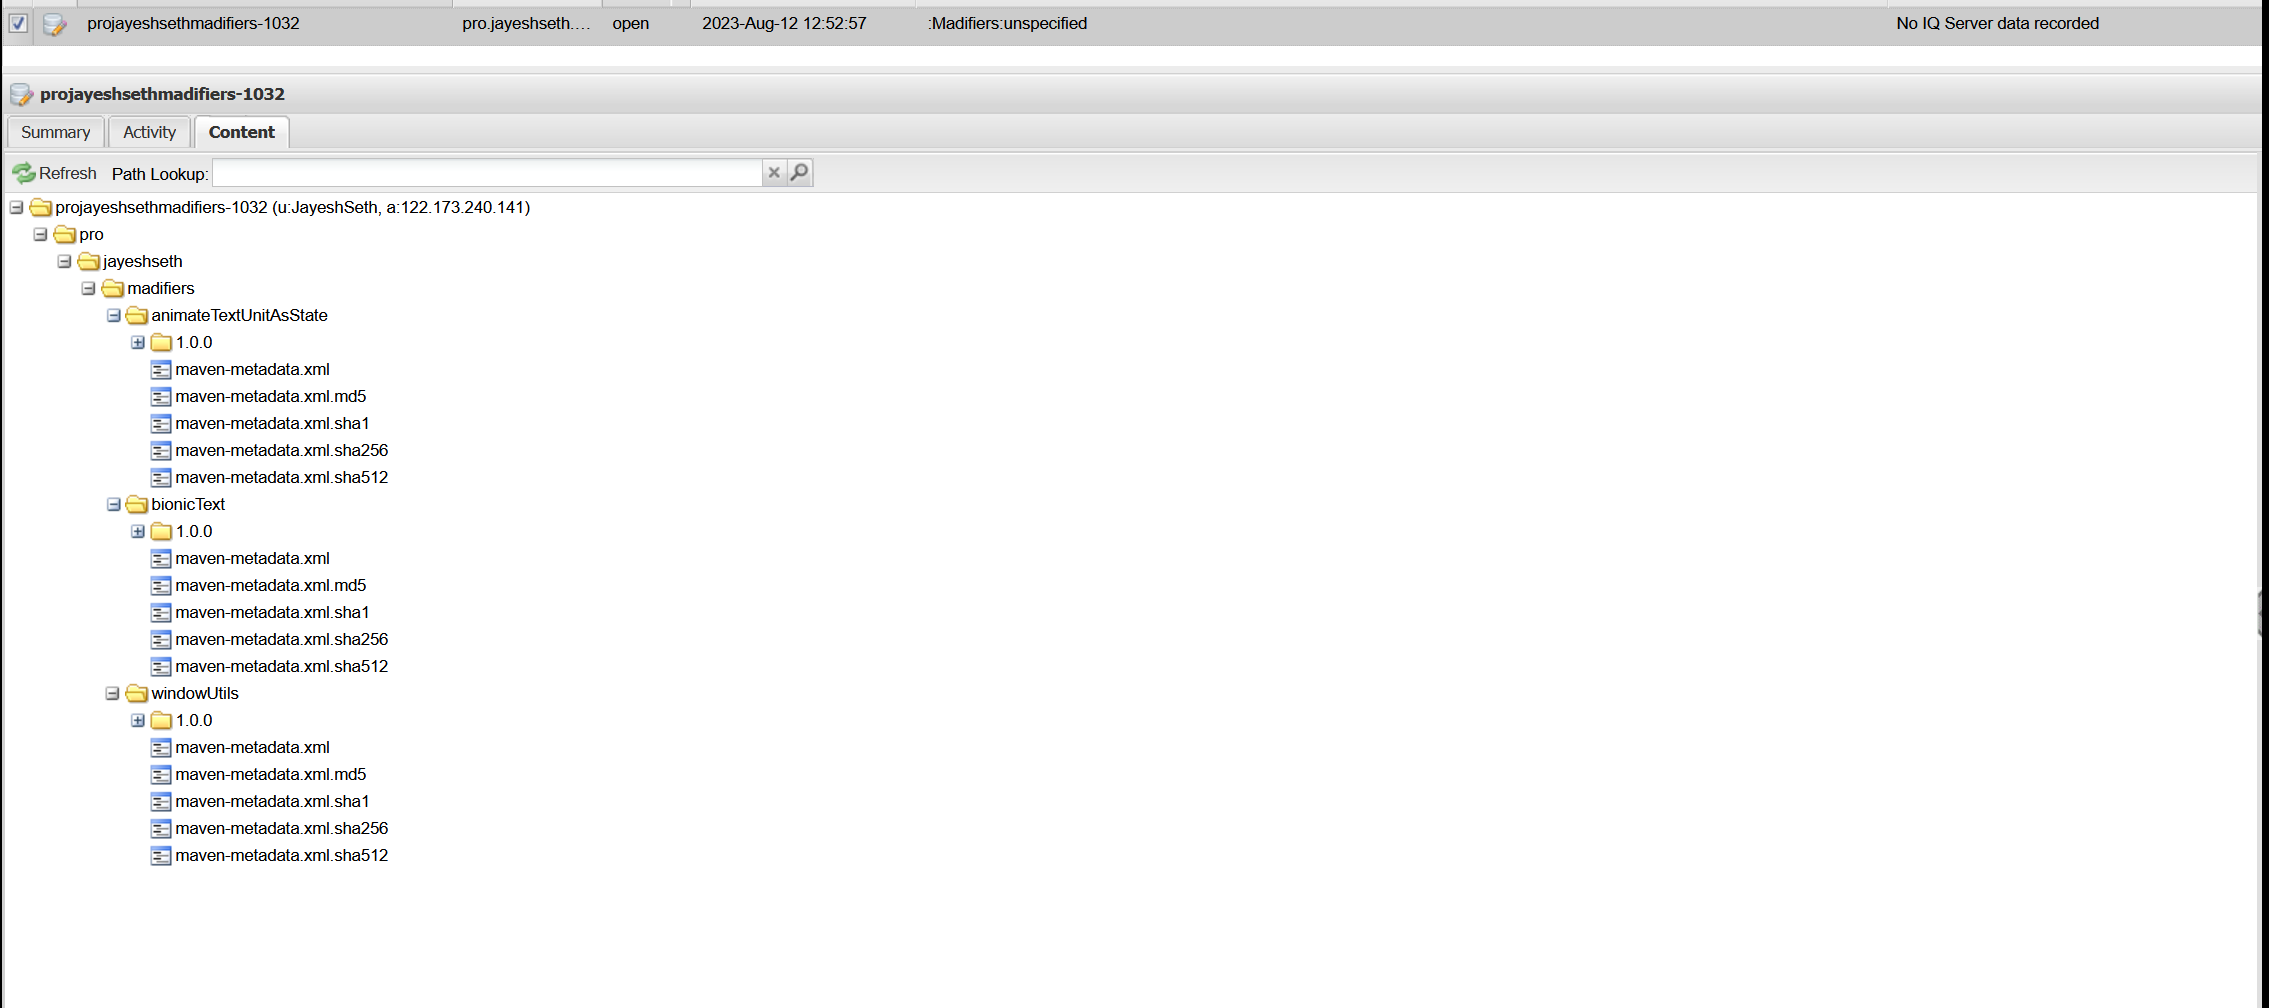
./gradlew yourModule:publishReleasePublicationToSonatypeRepositoryThen login to https://s01.oss.sonatype.org/#stagingRepositories and you should see your modules here:
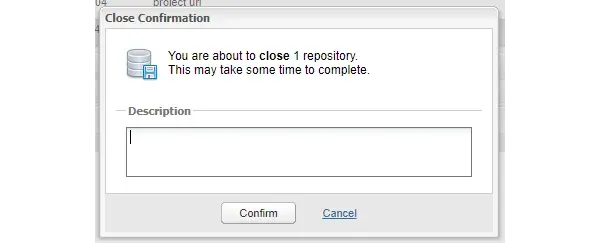
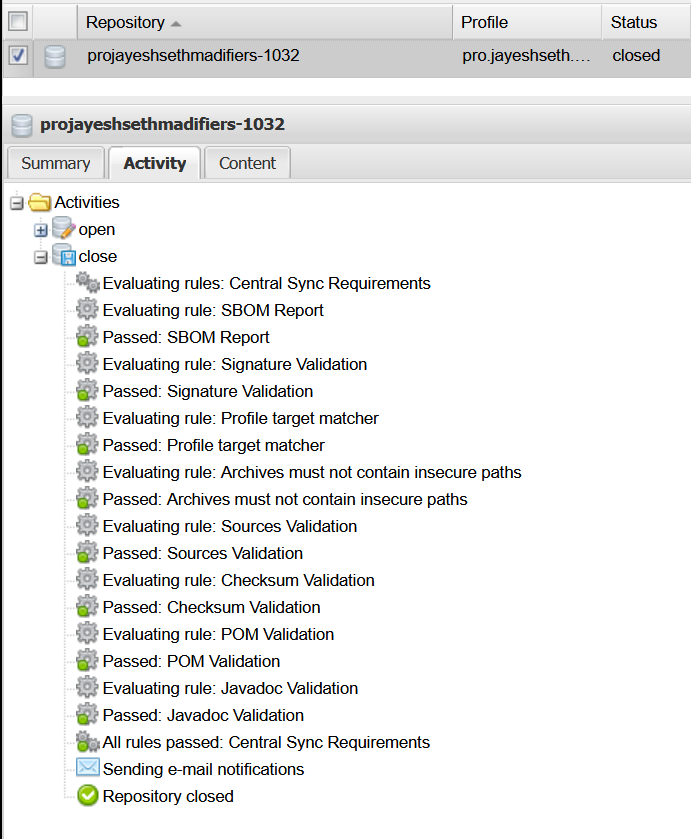
If all seems well, you can close the repo:
This will take just a few moments, and you can follow along with the progress in the Activity tab.
Once done, now you can release your library:
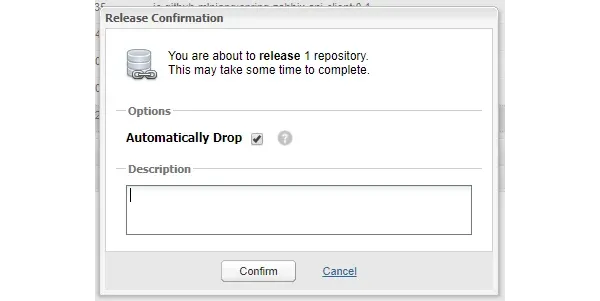
The time this process takes can vary a bit. If you get lucky, your artifact will show up on MavenCentral in 10-15 minutes, but it could also take an hour or more in other cases. You can check whether your artifact is available by going to https://central.sonatype.com/?smo=true and searching for your artifact.
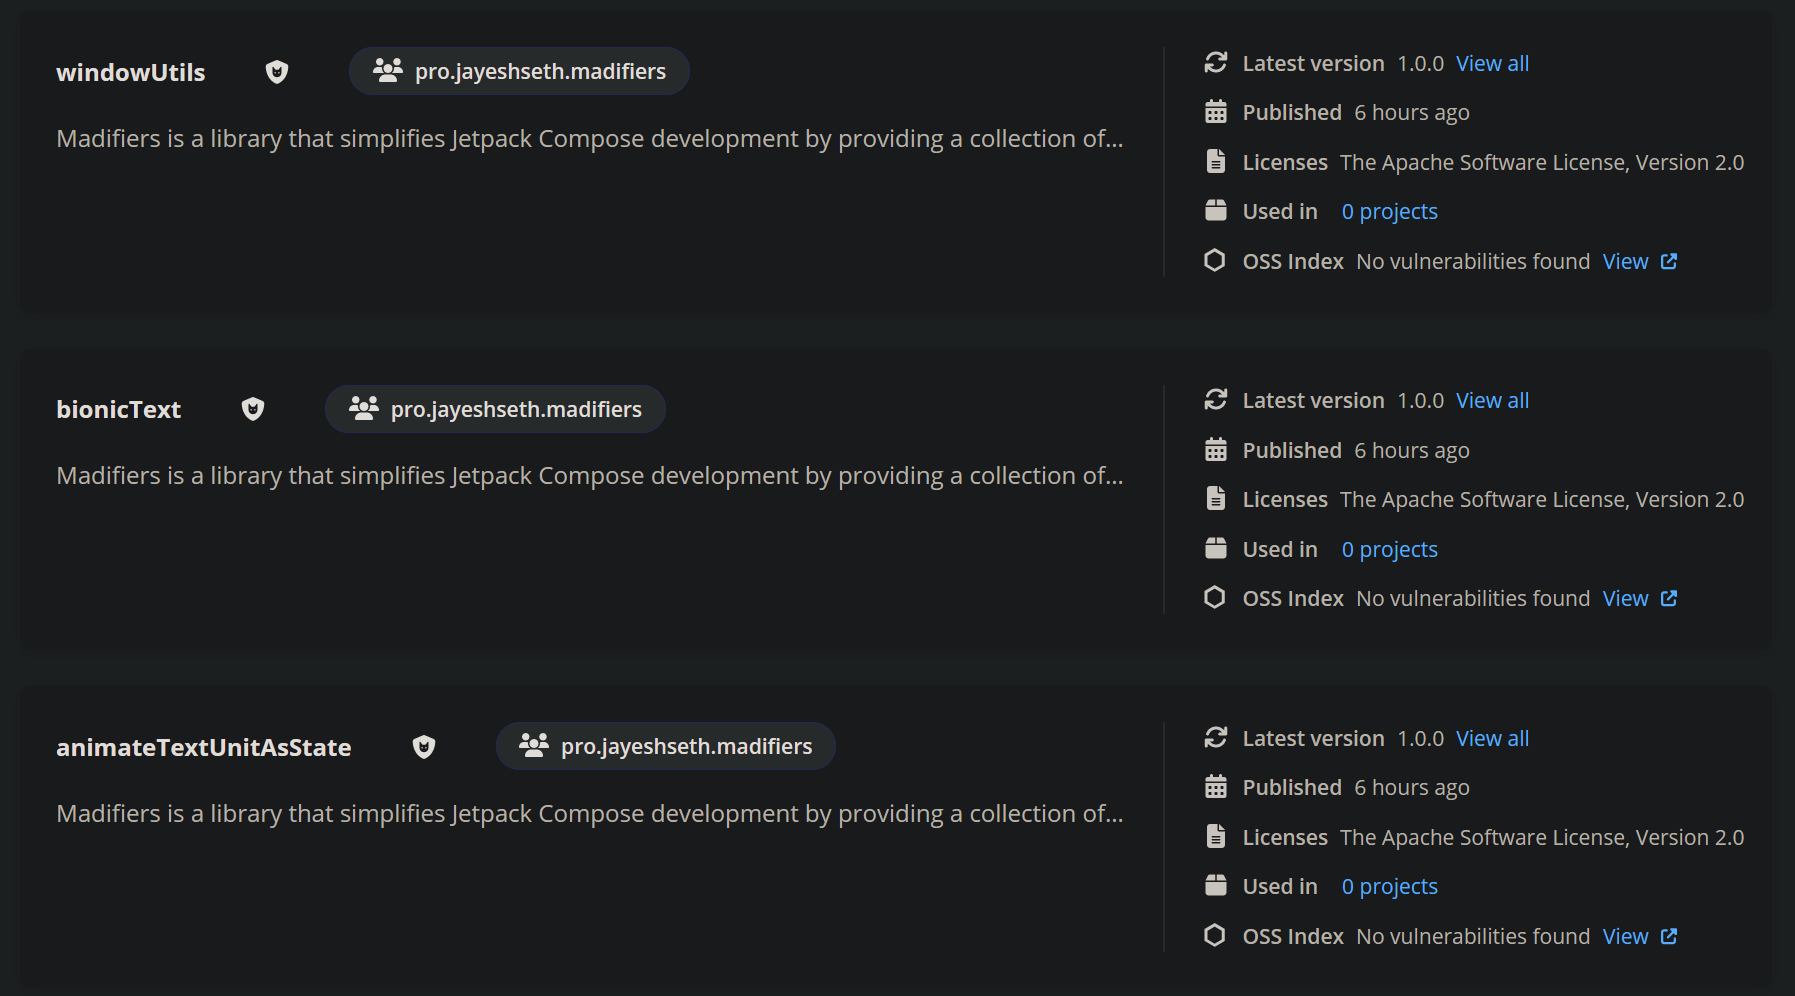
congratulations now you can share your library with the world to try out
Madifiers
Thank you for reading this blog. Hopefully, it helps you build your own multi-module library.
You can reach out to me on my LinkedIn at any time if you have questions. Well, you might me wondering – why create madifiers? Madifiers exists because the declarative nature of Compose lets us reuse our code, or make it more modular, which helps in reducing code duplication in large codebases. My goal with Madifiers was to create a library that does exactly that, while also making it easy to contribute, with the inclusion of an example module on how to make a library and get a platform to share code.
You can check out the documentation to know more about how it came to be "Madifiers". Also do check out the library if you are a Jetpack Compose developer, and I'll appreciate it if you're able to contribute in any way possible. You can learn more on how to contribute to Madifiers here.
Thanks again for giving this blog a read, and happy coding! :)
Bonus Links
Madifiers repository:
 MadFlasheroo7
Animate your compose app:

Learn about Open-source licenses:

See how you can boost your base fragment code quality: