Going from Native Android to Flutter


Flutter is an open-source UI toolkit created by Google to build and ship beautiful yet powerful applications across platforms with a single codebase. It supports platforms like iOS, macOS, Android, Web, Linux, Windows, and Fuchsia.
I have been doing native Android development since 2019, starting with XML and now with Jetpack Compose. The modern generation requires a beautiful yet powerful UI which XML wasn't meant to solve. Declarative UI is the answer, and this is the reason me and a large part of the industry have shifted to Jetpack Compose and Flutter.
This blog is my journey as a native android developer that went on to learn Flutter. Why Dart? What is hot reload? What are widgets? How is the development experience? How is compose similar to flutter? Is native development dead?
These are a few questions we will have a look at the solutions of on our journey to becoming a Flutter developer. If you're here, you probably know what Flutter is, so let's skip that and move straight up into the development environment setup.
The blog has gotten lengthier than I thought, so here's a table of contents for better navigation.
Table of Contents
- Installing And Setting Up Flutter
- Why Dart?
- What is Hot Reload?
- What are Widgets?
- Lifecycle Of Widgets
- Create, Build, and Run
- Kotlin/Java vs Dart
- Code Breakdown
- Is Native Development Dead?
- Conclusion
- Bonus Links
Installing And Setting Up Flutter
Flutter SDK ships with Dart, and so you don't need to install it separately.
To install Flutter, head on to:
https://docs.flutter.dev/get-started/install
and choose your operating system. If you use Linux, simply download the tarball, extract it, and add it to your PATH. Alternatively, you can do it using git:
git clone https://github.com/flutter/flutter.gitor for the stable branch:
git clone https://github.com/flutter/flutter.git -b stable
You can verify whether your Flutter installation succeeded by running flutter -v.
Android setup
If you have already downloaded Android Studio, run flutter doctor it should give you this:
Doctor summary (to see all details, run flutter doctor -v):
[✓] Flutter (Channel stable, 3.3.1, on Void Linux 5.10.138_1, locale en_US.UTF-8)
Checking Android licenses is taking an unexpectedly long time...[✓] Android toolchain - develop for Android devices (Android SDK version 33.0.0-rc2)
[✓] Chrome - develop for the web
[✓] Linux toolchain - develop for Linux desktop
[✓] Android Studio (version 2021.2)
[✓] Android Studio (version 2021.3)
[✓] Android Studio
[✓] IntelliJ IDEA Ultimate Edition (version 2022.1)
[✓] Connected device (2 available)
[✓] HTTP Host Availability

* No issues found!
if you get an error saying Android Studio can't be found, add it manually:
flutter config --android-studio-dir <directory>And finally, agree to the Android licenses:
flutter doctor --android-licenses
Additionally, you can check out additional Linux libraries here.
Why Dart?
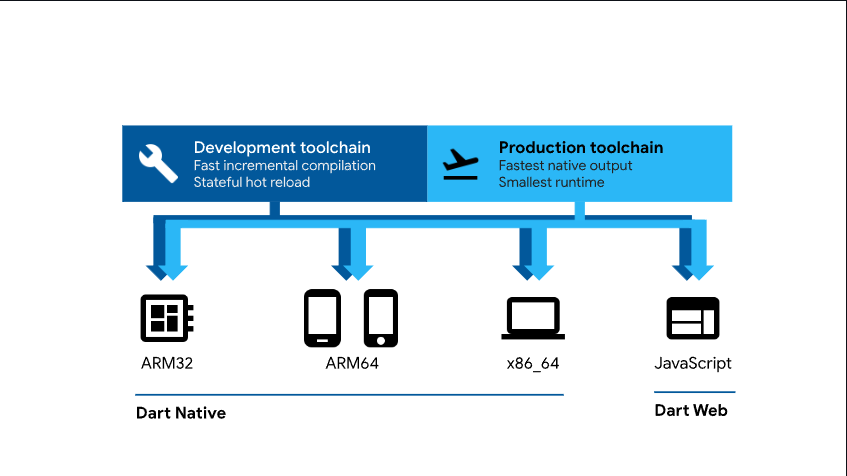
Dart is a client-optimized general-purpose programming language, designed to build fast and beautiful apps across multiple platforms such as arm64, x86_64, and even Javascript for the web, developed by Google and launched in the year 2011. It also has a JIT or (just-in-time) compiler which speeds the language up and improves developer productivity by adding features like Hot Reload and Hot Restart. Dart is a type-safe programming language just like Typescript or Kotlin, and also provides dynamic types and runtime checks when needed. On top of all this, Dart is null-safe and has a very popular and open-source package manager called pub, which can be found at pub.dev.
What is Hot Reload?
One of the amazing abilities Dart provides to flutter is Hot Reload – the ability to see most of the changes in the app source live, without restarting it. Wanna change layouts, colors, or widget sizes? Hot reload lets you do that without restating your entire app. So you try reloading the app but when you change your root class nothing happens... Why? The reason probably is:
Any changes that are outside of the build method will require a Hot Restart
and not just the build method -- if you change anything in initState() or dispose() or value of a static variable since these changes aren't called by build method, the changes won't be picked up by hot reload. Overall, in my experience, Hot Reload has been very useful and there were only a few scenarios where Hot Restarts were required.
What are Widgets?
If you are coming from the world of Jetpack Compose, think of Widgets as Composables. In fact, everything in Flutter is a widget, including your entire Flutter app itself, and if you look at Flutter's source code, many widgets are themselves made of widgets behind the scenes. So what the Flutter are widgets, and what's their lifecycle?
In Flutter, you can make two kinds of widgets -- Stateless and Stateful. The official documentation states:
The central idea is that you build your UI out of widgets. Widgets describe what their view should look like given their current configuration and state. When a widget’s state changes, the widget rebuilds its description, which the framework diffs against the previous description in order to determine the minimal changes needed in the underlying render tree to transition from one state to the next.
In simpler words, you define or declare how your UI looks through widget trees.
Basic Widgets
A few widgets that you are most commonly going to use are Text, Row, Column, Stack, Container.
- Text - This widget is used to add text to your application.
- Row & Column - they are like flex in CSS, allowing you to create layouts in either horizontal (Row) or vertical (Column) directions. You can also nest them if you want to.
- Stack - This widget is similar to the
Boxcomposable in Jetpack Compose -- It lets you place widgets on top of each other. You can then use thePositionedwidget to position your widgets relative to thetop,bottom,left, orrightof other widgets in the stack.
Find out more about widgets here.
Lifecycle Of Widgets
Before knowing about the lifecycle of widgets, it's important to know about the classification of widgets:
- Stateless - Stateless widgets are those that once created, can't be changed, and won't be able to react to any data changes. It is used when the UI relies only on the information inside the widget class.
class MyApp extends StatelessWidget {
  @override
  Widget build(BuildContext context) {
    return Container();
  }
}
- Stateful - A Stateful widget maintains data and responds to whatever changes happen in the widget. It's a mutable widget, It's used when it's required for the users to be able to dynamically update the UI, much like the sample counter app you get in the fresh project template.
class MyApp extends StatefulWidget {
  @override
  _MyAppState createState() => _MyAppState();
}

class _MyAppState extends State<MyApp> {
  @override
  Widget build(BuildContext context) {
    return Container();
  }
}
Lifecycle
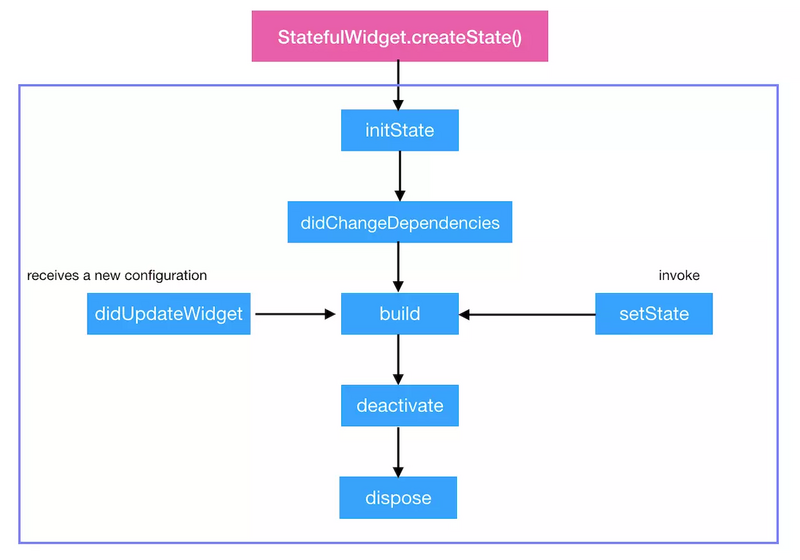
The lifecycle stages are:
initState()didChangeDependencies()build()didUpdateWidget()setState()deactivate()dispose()
Here are some more details about them:
initState()- As you could probably tell from the name, it's the first method that is run, similar toinit()in Kotlin. Here, you can initialize variables or properties of your widgets.
int a;

@override
void initState() {
  a = 0;
  super.initState();
}build()- The build method is called every time widgets are rebuilt. This can happen either after callinginitState(),didChangeDependencies(), ordidUpdateWidget(), or if the state is changed usingsetState().
@override
Widget build(BuildContext context, MyButtonState state) {
  return Container(color:Colors.red);
}
A deep dive into the lifecycle of widgets is beyond the scope of this blog post, but you can check out the following sources that go talk about these topics:
Medium articles:
- https://medium.flutterdevs.com/explore-widget-lifecycle-in-flutter
- https://abhishekdoshi26.medium.com/widget-lifecycle-flutter
Youtube:
Create, Build, and Run
Okay okay, I know you've had a lot of words to read, so now that we got our basics covered, let's begin the fun part -- creating, building, and running the app. To build Flutter apps you can use your preferred code editor or IDE.
In this blog, I'll try to showcase both Android Studio and VSCode.
Android Studio
Start with installing the Flutter and Dart plugin. Once its done, go to File -> New -> New Flutter project. This window should pop up.
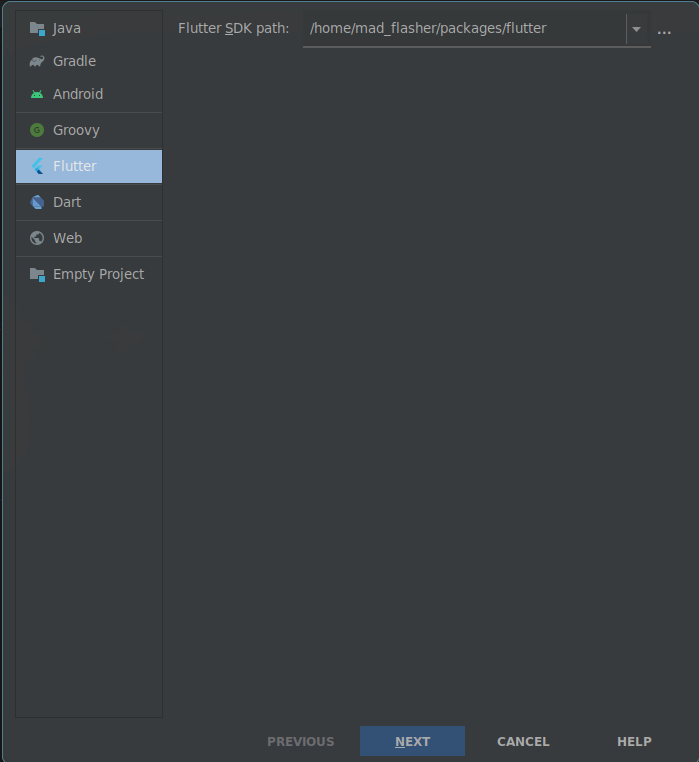
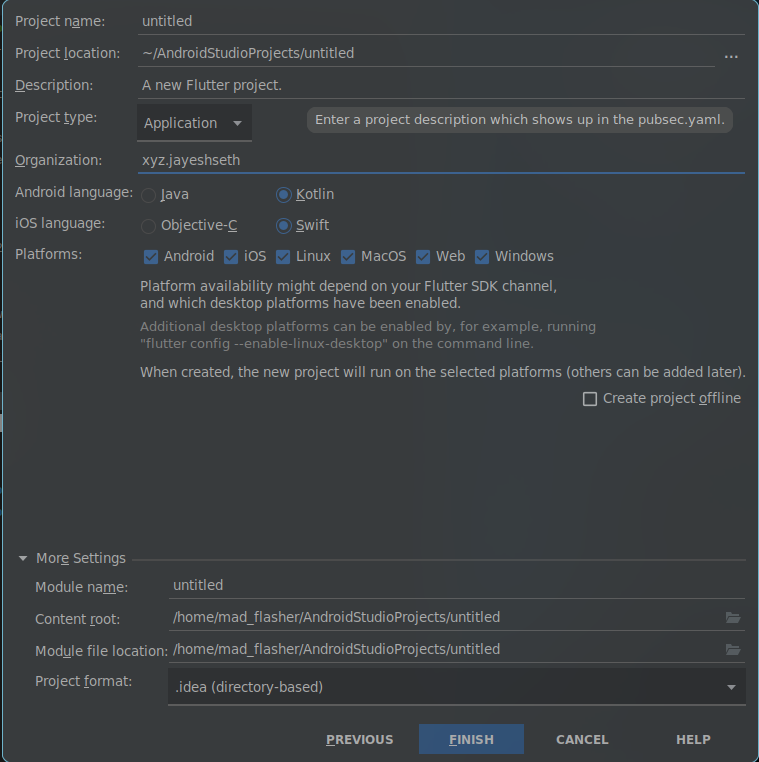
Set your Flutter SDK path, select your preferred settings or configurations, and then navigate to lib/main.dart to start with the code.
VSCode
For people using VSCode, the process is fairly simple. Start with installing the Flutter and Dart extensions, then head on to your terminal:
flutter create "<app name>"or if you want to set a custom organization (used as a package name on Android and as a prefix in iOS bundle identifiers):
flutter create --org com.domain.your "<app name>"Flutter should now generate all the necessary project files.
You can run your generated sample app by... wait, where can I run the app?
Everywhere :)
Okay -- in all seriousness, you can run the following command to verify what devices are connected:
flutter devicesit should return something like this if no android/ios device is connected
2 connected devices:

Linux (desktop) • linux  • linux-x64      • Void Linux 5.10.138_1
Chrome (web)    • chrome • web-javascript • Google Chrome 102.0.5005.61
Now, you can choose a device you want to run your app on, and run:
flutter run -d "device name"If you are new, the code might scare you, but don't worry; we're going to cover it soon. Before you get into the code, it will be good to get familiar with the various CLI options to boost your productivity. To learn more about it, click here.
Code?
Yeah, I know this is what all of you are waiting for! To start with our Flutter journey, navigate to lib/main.dart and you will be presented with something like this:
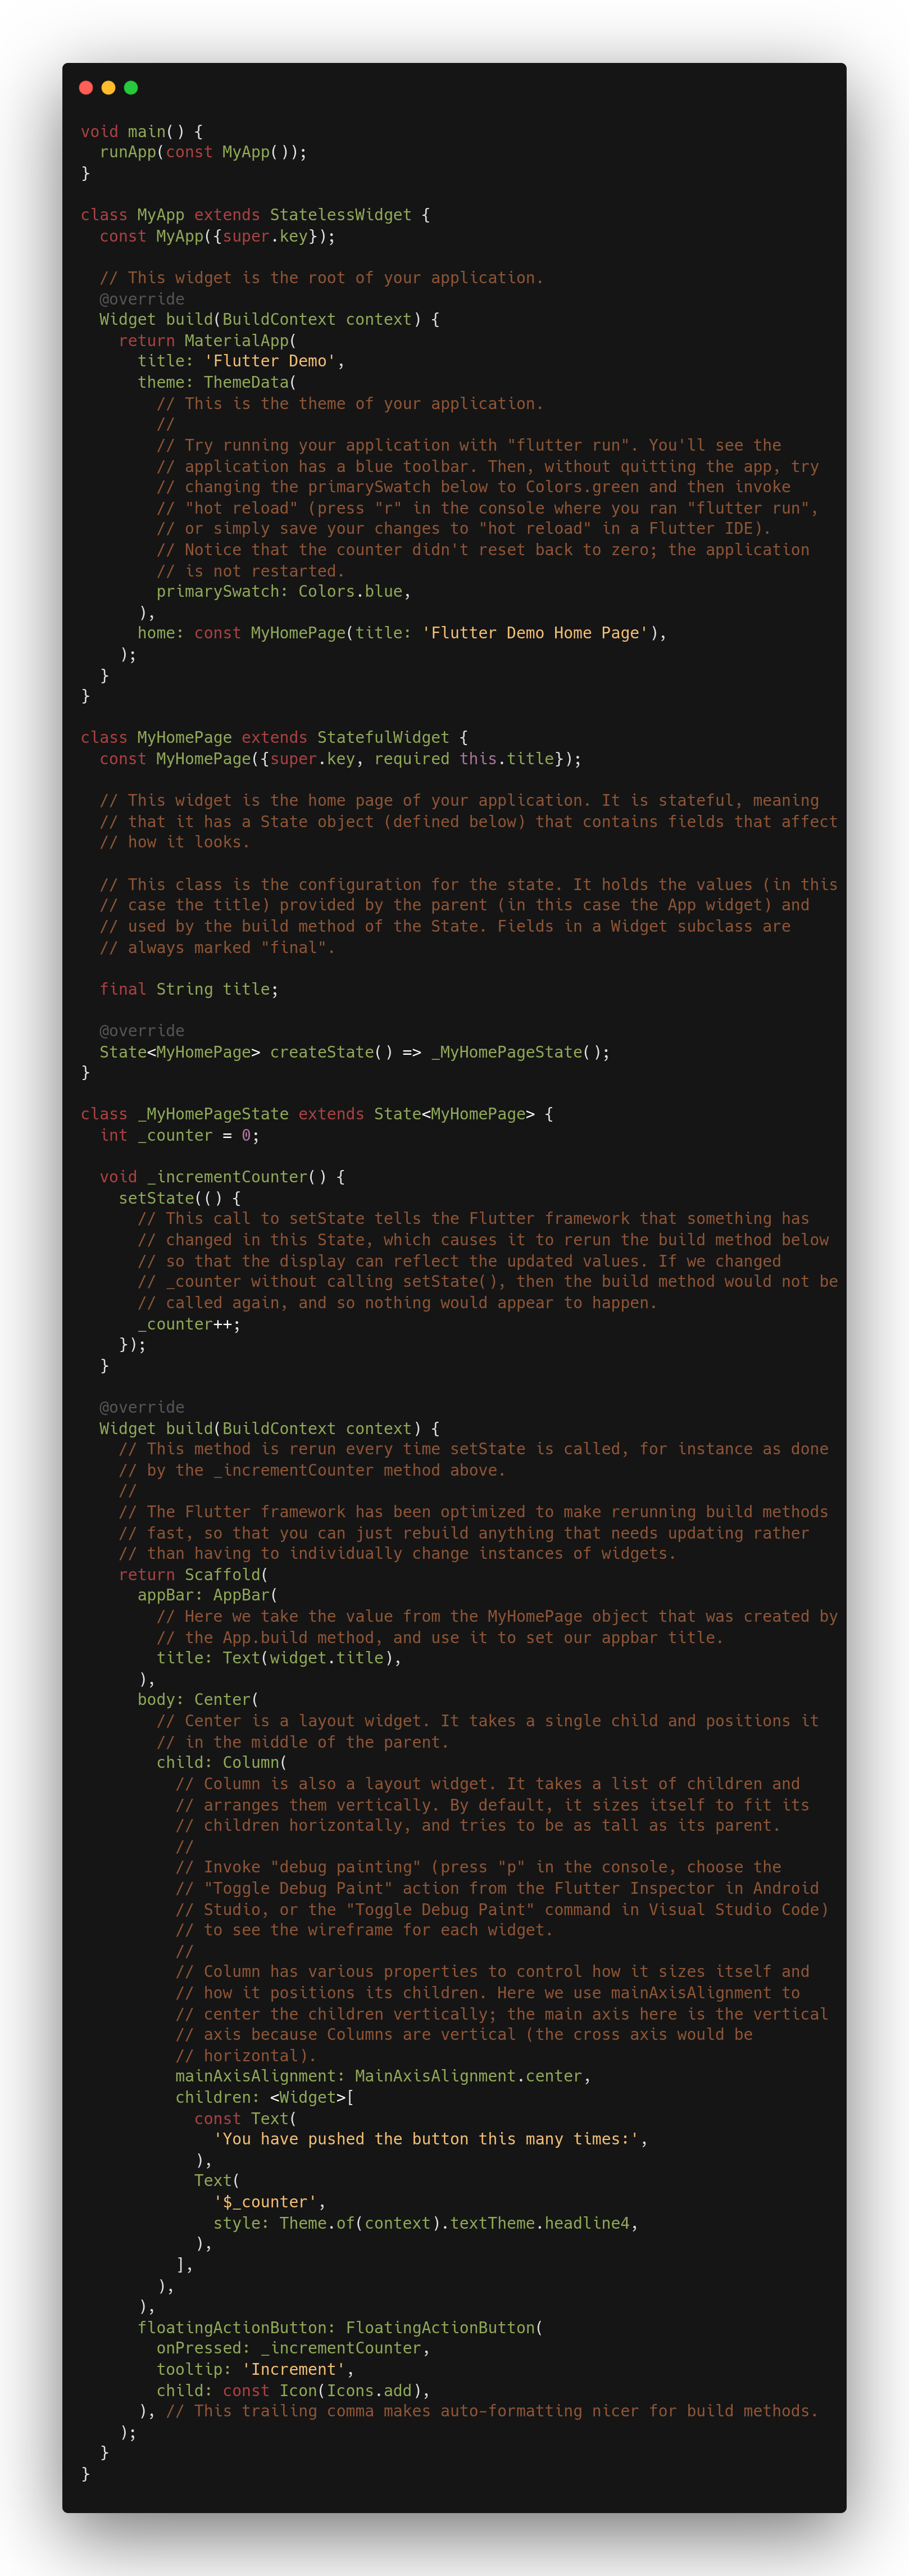
I know this code snippet can be overwhelming for someone just getting started, so I'll break it down line by line. To skip the code explanation and comparison of Dart with Kotlin, click here.
Kotlin/Java vs Dart
So to all the Dart devs out there, I don't want to be biased, but Kotlin feels better than Dart to me. There are a few reasons for that:
- Semicolons - I know what you're thinking, but after using Kotlin extensively Dart feels a step back just because of this minor annoyance.
- No
dataclass- this came as a shock to me! If you don't havedataclass, you have to either manually write acopymethod or write hefty boilerplate to letBuiltValuegenerates those for you.
class Person {
  final String name;
  final int age;

  Person({@required this.name, @required this.age})
      : assert(name != null),
        assert(age != null);

  // toString, equals, hashCode not shown for brevity
}
in Kotlin, it's as easy as:
data class Person(val name: String, val age: Int)- No Enums - Enums in dart can't have any values assigned to them. So, what do you do when you need values mapped to enum keys? You write a switch/case.
enum Environment { PROD, TEST }while in Kotlin:
enum class Environment(val url: String) {
    PROD("https://prod.example.com"),
    TEST("https://test.example.com")
}- Private variables - Dart has no
privatekeyword. Private fields are written with an underscore prefix
final _message = 'please release me';

void doSomething() {
    why(_message);
    println('is ${this._message}');
    final bar = _message + _message + _message + ' so hard';
}
Even though I don't find it annoying, it makes naming variables something you need to look out for.
Here's some material for further reading:
 Marc Reichelt
Code breakdown
Your Dart program starts with a main function:
void main() {
  runApp(const MyApp());
}
runApp is Flutter's binding function which takes a Widget as a parameter and inflates the UI. It is similar to setContent() in Jetpack Compose. This proves our earlier mentioned point --
Everything in Flutter is widget including the entire Flutter app itself
Now to go to the declaration of runApp() and get to know how it works internally, click Ctrl + Left Mouse Click on Linux/Windows or Cmd + Left Mouse Click on macOS. It should then look like this:
void runApp(Widget app) {
  WidgetsFlutterBinding.ensureInitialized()
    ..scheduleAttachRootWidget(app)
    ..scheduleWarmUpFrame();
}
Moving further, we get the root widget of the app:
class MyApp extends StatelessWidget {
  const MyApp({super.key});

  @override
  Widget build(BuildContext context) {
    return MaterialApp(
      title: 'Flutter Demo',
      theme: ThemeData(
        primarySwatch: Colors.blue,
      ),
      home: const MyHomePage(title: 'Flutter Demo Home Page'),
    );
  }
}
Here MyApp extends StatelessWidget, which itself extends Widget. Both Stateless and Stateful widgets are part of Flutter's framework.dart. Navigating to their definition provides wonderful self-documentation.
abstract class StatelessWidget extends Widget {
  const StatelessWidget({ super.key });

  @override
  StatelessElement createElement() => StatelessElement(this);

  @protected
  Widget build(BuildContext context);
}
The above code snippet takes a stateless element and a build method, and builds it using BuildContext.
The more you try to read definitions for Flutter framework functions you will get to know that most of the Flutter functions or widgets either extend each other or use each other.
Next comes MaterialApp which extends StatefulWidget. It provides many things out of the box, like theming, locale, and builder, along with many debug tools like performance overlay, debugShowMaterialGrid, showSemanticsDebugger, and so on. Moving on we can see that MaterialApp sets MyHomePage as home so let's break that down.
MyHomePage is a stateful widget since it has a button to increment the counter. When you click the button, the counter is supposed to react to a change/activity, and it's hence stateful. Stateless widgets will not be able to do the same, since they cannot react to any changes or user actions after creation.
class MyHomePage extends StatefulWidget {
  const MyHomePage({super.key, required this.title});

  final String title;

  @override
  State<MyHomePage> createState() => _MyHomePageState();
}
MyHomePage creates a "required" constructor title and calls _MyHomePageState() to create a state. So let's call it:
class _MyHomePageState extends State<MyHomePage> {
  int _counter = 0;

  void _incrementCounter() {
    setState(() {
      _counter++;
    });
  }

  @override
  Widget build(BuildContext context) {
    return Scaffold(
      appBar: AppBar(
        title: Text(widget.title),
      ),
      body: Center(
        child: Column(
          mainAxisAlignment: MainAxisAlignment.center,
          children: <Widget>[
            const Text(
              'You have pushed the button this many times:',
            ),
            Text(
              '$_counter',
              style: Theme.of(context).textTheme.headline4,
            ),
          ],
        ),
      ),
      floatingActionButton: FloatingActionButton(
        onPressed: _incrementCounter,
        tooltip: 'Increment',
        child: const Icon(Icons.add),
      ),
    );
  }
}
This class extends the State class. Then, it creates a private int variable counter and assigns an initial value to 0. Next, we have a private function named _incrementCounter(), which uses setState which (in itself requires a blog but the gist of it is that) it tells the Flutter framework that some state change has taken place, which causes the build method to rerun and update the values.
Next, it overrides a widget that returns a Scaffold. The scaffold widget behaves similar to how it does in Jetpack Compose -- it's a material layout widget that helps you build a layout quickly and place certain widgets automatically like appBar, drawer, and floatingActionButton.
It then adds an app bar and uses Center, a widget to center the provided child widget, which in turn shows a column widget. Here, you might be confused with child and children.
Much like you would have expected, child widget is a single widget, whereas the children property expects an array of widgets. With that out of the way, let's move on to Column.
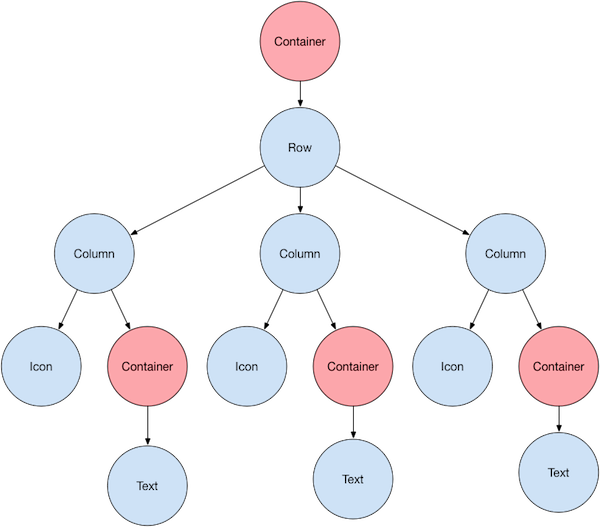
Flutter also contains layout widgets or handlers just like compose has Row, Column, and Box (which is Stack in Flutter). A common Flutter layout tree could look like this:
mainAxisAlignment: MainAxisAlignment.centerthis makes the layout's children aligned to the center, and then with a bit of that Scaffold magic, the floating action button gets placed right where it's needed to be.
The mainAxis in this case is the Y axis, because it is the main axis for a column. The main axis for a row is the X axis.
Is Native Development Dead?
Well, the short answer will be No, It Never Will Be. Every framework or UI Library has its own use case. If your business requires quick development or you can only afford a small team at a time hybrid frameworks like Flutter would be a better choice but if your app needs to access core system services or provide a smaller download size along with the best possible performance, native is the way to go. Hope you make your product decision wisely.
Conclusion
Using flutter feels polished after having some experience with Jetpack Compose. I tried my best to break-down the code for a better explanation. Hopefully this blog encourages many existing native android developers or even new devs trying to learn Flutter to get a grasp of Jetpack Compose as well. If this was helpful for you in any way or if you have any queries, catch up with me on my social media!
- Linked In - https://www.linkedin.com/in/jayesh-seth
- Twitter - https://twitter.com/Madflasher
- GitHub - https://github.com/MadFlasher
Bonus Links
This section contains some references and some additional links to help you learn more about Flutter:
YouTube:
Additional Links:
- https://medium.com/ruangguru/an-introduction-to-flutter-clean-architecture-ae00154001b0
- https://docs.flutter.dev/
- https://dart.dev/guides
Until next time! :)